Showing posts with label dress construction. Show all posts

Apr 25, 2012

Constructing Maisie's Easter Dress, Part 3

I'm getting close to finishing this dress. The sash is attached, the side seams are sewn in a french seam, now I need to add the sleeves.  Sometimes that is the most difficult part of the process.


This is the sleeve, there are two basting stitches sewn along the top and the bottom.


I didn't photograph a few steps....sorry....I sewed pipin to one side of each cuff and folded the other side of the cuff under 5/8" and pressed.  I gathered up the bottom of the sleeve to fit the cuff, and sewed along the stitching line.


This is the right side of the sleeve.  The piping shows right at the seam line, thank goodness!  I hate ripping stitches out, although I keep my handy Clover seam ripper by my side.  I do use it from time to time :)


I turned the cuff lining to the wrong side of the sleeve and pinned it in place.  Notice the french seam on the sleeve?  I love them because they are pretty and there is no raw edge.


I handstitched the cuff lining to the sleeve using a blindstitch.


I pull up the gathers at the top of sleeve and pin the sleeve to the armhole, adjusting the gathers to fit.  I sewed all the way around and finished the raw seam with a zig zag stitch to keep the seam from fraying.


I folded the bottom of the dress under l/4" and pressed the seam.  Then I turned up the hem 5".  It is customary on these old fashioned dresses, to have a deep hem.  It gives the dress weight and is also practical because you can let the hem down as the child grows.  The dress is finished!!!


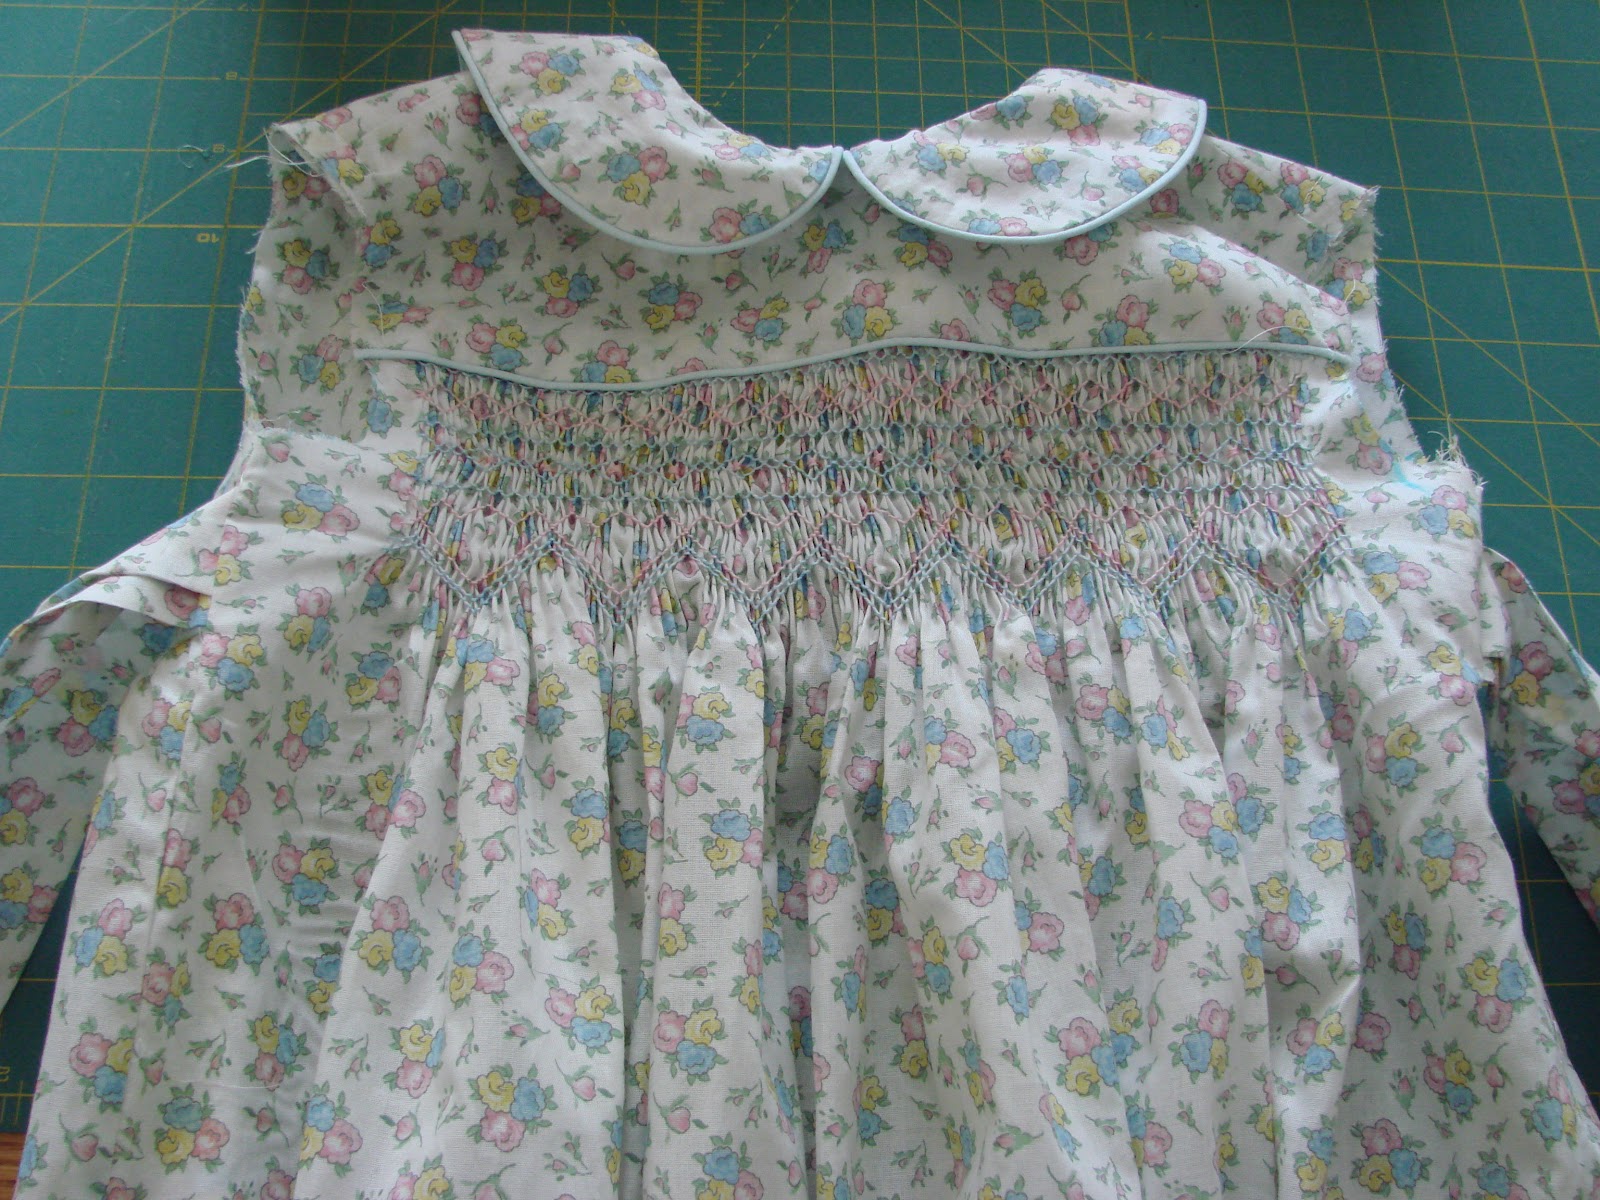
Here is a close up of the dress, just like the ones I used to wear as a little girl.


Here is the back of the dress, I sewed four buttonholes.  My sewing machine has an automatic buttonholer so it wasn't too difficult.


This is what the sash looks like tied in a big beautiful bow!


I made a slip for the dress because the fabric is a little see through.  I have made so many of these slips, I also make them for nighties.


The neck and armhole seams are finished by sewing on the lace and enclosing the seam with a zig zag stitch.


The back of the slip has a placket and is attached with two buttonholes and buttons.


On Friday, I will show you what Maisie looked like in her Easter dress :)  I saved the best for last!!!


post signature

Apr 23, 2012

Constructing Maisie's Easter Dress, Part 2

This is the second of a three part post.  I just felt that there were too many pictures to put on this post at one time.  
Now that the front smocked skirt is attached to the front yoke, it is time to cut the pleating threads.  If the threads are cut before the smocked skirt is attached to the yoke, the pleats will relax and will be very difficult to attach.  The pleats won't stay taught, they will go to the left and the right and won't look nice.


Pulling out the threads is exciting because you can see what the smocking really looks like!


It is time to attach the front yoke lining.  I pin it down on the back with my "extra fine" needles that I love so much.


I handstitch the lining to the front skirt using a blind stitch.


The piping is lined up along the top row of the smocking, perfect!


Notice how the yoke in the front is high and the bodice in the back is low?  Well, the dress pattern tells you exactly how many rows to smock according to the size.  The bottom of the smocking matches the bottom of the back bodice.  There is an option to smock the back of the dress also.  In that case, you would use a high yoke in the back instead of a low bodice.


Now I machine baste the two layers of fabric together around the armhole.


The next step is to attach the sashes to the side seams.  The bottom of the sash should be touching the seam that joins the back bodice to the skirt.  The top of the sash should be just the seam allowance under the armhole.  The seam allowance is 5/8".  I form a pleat in the sash facing downward so that the sash fits.  It also gives the sash a nicer look.


I always sew a french seam when I am sewing this dress pattern.  It encloses the seam and is so easy to do.  It does take an extra step though.  I sew the side seams wrong sides together, with a l/4" seam.  It looks like the seam will show on the right side of the dress.  I trim the seam to 1/8" and press it to the side.  
Then I turn the dress so that the right sides are together.  I pin the side seam again, and sew a 3/8" seam.  


Press and you have a french seam, as easy as that!

post signature

Apr 20, 2012

Constructing Maisie's Easter dress

I want to walk you through what it takes to construct a dress.
First, cut out all the pieces.


I wanted to add piping trim, so I stitched it on with a basting stitch. Piping was added to the two collars and front yoke and back bodice.  The back bodice will be folded in half, creating a lining.  The piping is only added to half of the bodice.  


I sewed the collar facing to the collar and turned them right side out.  I used the basting stitch as a guide for the stitching line so that the piping would show.


This way of lining the yoke and bodice is a little confusing at first, but the results are great.  You attach the pieces at the shoulder until it looks like a circle.


The two collar pieces are attached to the front yoke.


Fold the circle in half and stitch. Clip the seam allowance around the curves.  Notice the straight pins?  They are  wonderful!  I can sew over them time and time again, and my machine needle doesn't break, the fabric doesn't snag or pucker.  They are made by Clover, extra fine glass head pins.  You can also iron over them.


Turn the fabric right side out and you have a perfectly enclosed collar.


The back skirt is a rectangle.  You find the middle and cut a 3" slit and attach the placket.


I made the sashes, rectangles folded in half and stitched, making a pointed end.


Gather the skirt back and attach to the back bodice.


Wrap the bodice lining around the bodice and skirt and stitch.  Turn it right side out and your back bodice is completely lined.


Sew the skirt front to the front yoke.


To be continued in the next post.

post signature